Showing posts with label Couplings.. Show all posts

Friday, 10 June 2022

00 Gauge Watershoot Bay update.

Basic ground cover- paint- applied. It already makes an improvement.

One of the re-imagined 4 wheeler from a GN Hornby model- captures the essence of IOW early coaches.

The Southern Vectis bus makes an appearance, this be repositioned when the roadway is built. Hopefully the 'Southern Vectis' lettering will be more visable.             


The coal wagons have had a Sprat and Winkle coupling fixed to each end of the rake of four. The couplings between them are shortened proprietry type.


Thursday, 14 April 2022

0 gauge wagons for S&DJR.

Three wagons to add to the S&DJR fleet.

A couple of Dapol offerings, one 5 plank and a 7 plank. Although somewhat fanciful they were repaints- one poorly- which I already posessed so no need to purchase more.

The third is a Slaters Midland Van which has been re-branded.

All have spurious numbers gleaned from transfer sheets from previous builds.

All with Sprat & Winkle couplings.


Sunday, 10 October 2021

00 Gauge Isle of Wight 4 wheel carriages.

As a result of the Isle of Wight trip, I now have a rake of 3 4 wheel carriages to pair with my Hornby Terrier, Number 2 'Ventnor'.

The set number is wrong and should really be a 4 carriage set.

Also I purchased the Oakwood Press 'Isle of Wight Steam Passenger Rolling Stock'.

So I have no reason to get the rake and individual coach numbers wrong!

The couplings have also been shortened as to make them closer coupled.


Tuesday, 27 July 2021

Modified OO gauge couplings.


 A while ago I posted about modifying RTR couplings to shorten the distance between coupled stock.

Well, the result is shown here. The sprung buffers on the Pannier Tank helps although on St Mewan curves are generous.

I certainly think that the appearance is much better than standard couplings.

Saturday, 17 July 2021

Knightwing Diesel and Sprat and Winkle couplings-00 gauge.

The modified Knightwing Diesel Shunter has been completed.

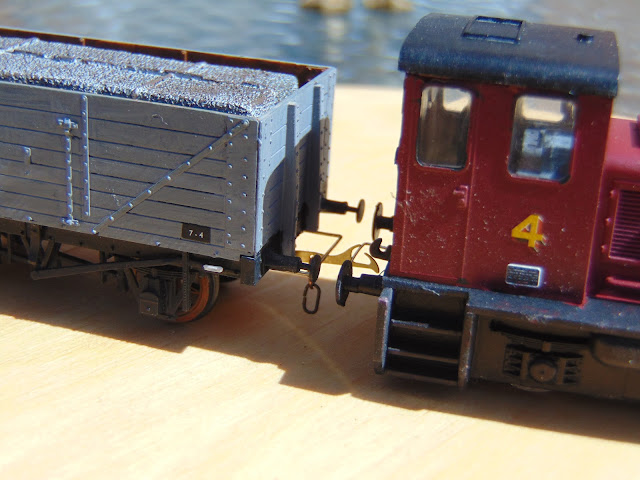
It has been fitted with loops for Sprat and Winkle couplings.

Below is a shot of the shunter coupled to a 7 plank wagon.

The distance between loco and wagon has been reduced as far as possible due to the tight curves to be used.

Projects being finished so a new challenge to be found soon.


Monday, 28 June 2021

800th post-00 NEM couplings shortened.


A pal of mine showed me a way he had closer coupled stock using Bachmann/Hornby NEM couplings.

As one who is always prepared to shamelessly pinch others ideas this is my take.

The female socket has been shortened as has the coupling. A hole drilled through both parts and countersunk to ensure the pin doesn't protrude.

It reduces the length by about 3mm which isn't a lot but is a first effort.


Tuesday, 20 April 2021

Completed 009 Wooden kit wagons.


 Both wagons are now finished. They are connected by a simple bent brass pin which will also be used on subsequent wagons.

They will be run as a rake of six with a Greenwich coupling at one outer end and a coupling with no loop at the other.

I am very pleased with the result and await further kits.

Thoroughly recommended for a beginner as the chassis is RTR and the wagon simple to assemble.


Friday, 2 April 2021

3mm wagons completed.

The four wagons with Fencehouses chassis have been completed.

They all have had weight added and my usual 3mm scale West Harptree couplings, from Worsley Works etches, added.

They make a nice unfitted rake which roll superbly.

Maybe, once we are back exhibiting, I will find a local show to give them a run- but not this year!


Monday, 8 March 2021

009 mass wagon building- so many kits, so little time!


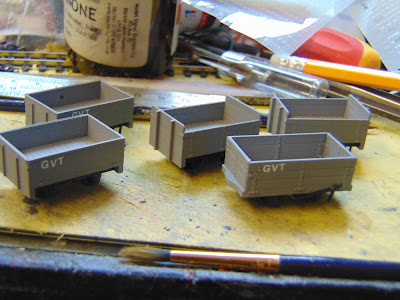
 At last continuing on with stock for the GVT, there has been mass production (well Five) of suitable wagons.

All have been suitably branded and will have crushed granite loads.

I have tried to keep the weights roughly equal to ensure reliable running. Other than the two end wagons each will have an uncoupling loop on one end only. 

Moving in rakes with reliable attachment to each other removes the possibility of runaways!


Removable loads have been created with plastic card on square risers which are covered in crushed granite- this from Attwood Agregates who do a selection of grades for different scales.


The completed rake- I may relent and number them all in the style of existing wagons.


Thursday, 11 February 2021

00 Gauge English Electric Type 3 modifications.

I have had several English Electric Type 3's later Class 37 over the years. Not until now have I managed to aquire an early all green example.

D6722 is a Lima product and, after servicing, runs rather well.

OK so its out of era for St Mewan but hey it's lockdown and it's my railway etc.

Firstly the buffers had to be swapped from the oval ones fitted to some nice shiny round turned brass one's because thats what D6722 was outshopped with at the Vulcan Foundry.

Next the couplings were cut off flush to the bogie frames and some .5mm nickel silver wire was fitted into holes drilled in the loco's chassis. The buffer beam was painted black as per the prototype. Coupling height was checked with a Sprat and Winkle fitted brake van and adjusted accordingly.

A trawl through the 'net provided some headcodes appropriate to the St Austell area on clay train workings. Once these have been applied then basically that's all i'm going to do to this one.


Wednesday, 6 January 2021

Pre-nationalisation stock for St. Mewan.

It was always my intention to have a collection of pre-nat stock for St. Mewan.

I have slowly been collecting wagons from around the St. Austell and Fowey area that can be used on the layout.

Four or five wagons have so far been sourced together with a few GWR items of stock. 

Luckily it doesn't need a lot to operate St. Mewan. I still need a couple of GW locos though, brake vans I already have.


 I was therefore pleased to find a shunters truck already branded for Fowey which will serve my purposes.

It does need a resident shunter which I will have to find. 

Until then I still have to decide which couplings to use- tension lock or Sprat and Winkle.

Friday, 23 October 2020

00 Gauge Dapol Cattle Wagon.

The two cattle wagons I have, one Hornby and the other Bachmann ,have an amount of detail around the coupling area.

Visiting Alton Model Centre recently I found a Dapol BR version which perfectly fitted the bill. Just removing the coupling locating screw gave a nice flat surface to fit the Sprat & Winkle coupling.

The 3mm version is being used on the wagons to be shunted- short rakes will be the norm.

A hole drilled each end enabled the wire to be slid in and secured with a spot of superglue and its all ready for service.


Saturday, 10 October 2020

00 Gauge Paint your wagons!

 The Southern Van in primer- pin point berings have been mashed so dont become clogged with paint. 

Excess Mek stain should disappear when matt varnish has been applied. First the chassis has to be painted then transfers applied. On order from Railtec-https://www.railtec-models.com/index.php

This one is a Dapol Western Mogo van which came as part of a recent lot.

 Just parted the body from its chassis- fitted with Sprat and Winkle couplings.

Just the roof to paint, transfers added , varnished and then can be re-united with its chassis.


Again a primed western Van which will have its chassis and buffers painted and transfers applied- again from Railtec,before a coat of Testors matt Varnish is applied.

Then wheels can be refitted and the roof , which has also been primed-this time grey , can be stuck in place.

Nearly forgot! Both the Ratio vans have had a piece of lead glued to the van floor for stabilising weight.


 Whilst the rattle cans were out this Dapol 5 plank, bought with GW branding, was dismantled from it's chassis and primed in grey.

Once completely dry all that is needed is to apply transfers and matt varnish before being re-united with its Spratt and Winkle fitted chassis.

Once these are completed there are a couple more to make but first magnets need to be fixed in place on St Mewan.Wagons will be in rakes of 3 or 4 with coupling convertor wagons at either end.

Wednesday, 30 September 2020

00 Gauge Sprat and Winkle couplings.


There are two possible sizes of Sprat and Winkle couplings to choose from to use with 00 gauge stock.

On the left is the 4mm scale designated one which is for remote uncoupling and shunting. So, after looking at the original type seems somewhat oversize.

The option is to use the 3/4mm scale ones which are a lot smaller and neater.


 The 4mm size is shown attached to a Bachmann Toad Brake Van which to my mind looks far too big.

So, another order to Wizard Models resulted in an etch of 3/4mm couplings which are a lot neater and enable closer coupling. As St Mewan is a small layout ,tight curves are not an issue so reduced distance between vehicles is possible.


Then I found these on a well known auction site which, on arrival had the smaller type fitted.                     
Shown here is one of the wagons as received with the coupling made with the mounting plate- a lot neater I think you will agree. So after that I have decided on the 3/4mm type.     My biggest problem is making and fitting the 3 links to attach to the paddle to enable magnetic uncoupling. My eyesight wont enable me to assemble them without a lot of frustration.             
This is my attempt at fitting the couplings. instead of assembling on a mounting plate some .4mm holes to thread the wire through were drilled in the wagon base.
Loops are bent from .33 nickel silver wire and superglued in the holes so that, if required, the original couplings could be refitted with a minimum of damage.
So, now I am on a roll and waiting for some preformed links from H&A Models.

Monday, 28 September 2020

Making and fitting the first Sprat and Winkle wagon coupling.

Cracking on from the last post sees one van as received and the way the previous owner had fitted the couplings.

Then started a batch build of the later type together with uncoupling loops. This is where you find that your eyesight isn't as good as it was! I ended up enlarging the soft iron loops so I could see them to fit to the paddle. It ended up with me fitting the loops before fixing the paddle to the mounting plate. thus the first wagon fitted by me was a conflat.


Sprat and Winkle fitted 4mm wagons.


Whilst browsing the internet, I came across some EM Sprat and Winkle fitted vans- three in total.

More out of interest on how the couplings were fitted I rang and purchased three.

Swiftly delivered they turned out to be in excellent condition, the Palvan was kit built very well the other two were Bachmann. There was a lot of care taken to build and fit the couplings. The EM wheelsets were quickly re-gauged but were replaced with 00 gauge examples.


 The couplings turned out to be the ones that cant be shunted when uncoupled but a quick order to Wizard Models produced an etch of the later type plus some mounting plates- so to work!


Monday, 24 February 2020

009 Coupling hooks.


Recently received from woodworm2014 on e-bay are these plastic hook couplings.

I have found that spare metal loops fit perfectly.

Recommended!

Thursday, 24 October 2019

009 Nine Lines Welshpool and Llanfair Brake Van.

 I have had this kit for some time but until now it languished in the to build drawer.

A Nine Lines kit, it fits together after a minimum of flash has been removed and the pieces squared up when released from the sprues.

The kit was supplied with wheels, spoked with metal rims and pin point axles.

When it had reached the stage shown in the first photo, it was given a coat of grey primer which will do as a top coat.
 The roof was also undercoated, this time in white, also the finished colour.

When dry, and left for a couple of hours, The ends were painted vermillion and the underframe black. A guard was also fitted.

Once all was dry the numbers, six in this instance, were added. A coat of matt varnish was applied before the glazing was fitted- clear plastiglaze.

Finally Bemo couplings were modified with uncoupling pins before being secured with epoxy glue.